Incomplete I/O
A collection of ones and zeroes that fell out of a loose connection somewhere.
A collection of ones and zeroes that fell out of a loose connection somewhere.
Content related to AI and Large Language Models (LLMs).

With the sporadic, yet increasing sound of Artificial Intelligence Agent Foot-Guns1 going off in the distance, I’m left wondering whether we’ve forgotten the lessons of the past. Or perhaps in the rush to use Large Language Models (LLMs) for everything we’re forgetting to put up the same guard rails we did to protect ourselves from Organic Intelligence “hallucinations”. What am I misssing?
It seems like every other day, we’re reading about someone’s experience with LLM-driven automation, such as Agentic AI, ending in tears and with fewer toes. Entire datasets and backups gone. Whole software repositories left a smoking crater.
This isn’t an anti-AI post by any stretch. I’m not an AI naysayer, preaching about the impending AI-pocalypse. But I’m also not a member of the AI cult, drinking the Kool-Aid without checking the ingredients. Like any tool we’ve developed in the industry ever, once you see past the hype, there’s value to be had, but also caution to be exercised.
I started my first software development job in 2000. I already had some years of running production systems in previous roles at that point, all using the only thing we had back then – Organic Intelligence. But my employer at this software development company didn’t, on my first day, hand me the keys to their customers’ production databases to drop it as I see fit. So why are folks out there granting these agents the ability to wipe out a whole dataset?
A few years further into my career, I was running some security and other courses for telecommunications companies, utility companies and government. One of the key security concepts we used to drive home was to grant the least privilege necessary for a given user. So why are folks out there granting agents permission to wipe out entire software repos. In most organisations I’ve worked for, we generally all have to create a pull request and have it reviewed before it’s merged.
My (admittedly relatively new) experience with self-hosting LLMs and agents suggests that there are numerous ways to separate different concerns for different agent functions. It’s also definitely possible to have LLMs write test cases that would also act as an extra set of checks and balances.
A previous employer and mentor of mine once described there being a difference between a software engineer or software developer, and someone who can write code. In some ways, the code written is less important than some of the other things that the job entails.
LLMs can write code, but there’s a lot they’re missing that an engineer brings. The same likely applies for other automated tasks.
So whilst we’re offloading the writing of code (arguably the most fun part) to AI, perhaps we need to remember to take care of the rest of the job that AI can’t, and to supervise it with the same sorts of guardrails we would any human with Organic Intelligence.
The term foot-gun is common slang for tools or functionalities within a technology that grant the user all the power they need to shoot themselves in the foot. ↩︎
Content related to the GNU/Linux operating system.
The Linux kernel exposes a great deal of per-process information through the /proc filesystem interface. This can be very helpful in things like:
We’ll look at a few common, useful objects under the proc filesystem, but you can do no harm looking around, so please do.
Under /proc, there is a subdirectory for each process ID (PID) currently running on the system. There is also a special symbolic link called self that points to the PID subdirectory for the current process (your shell). For example:
We’ll take a look at few examples below, and potentially look at others in future articles.
Let’s say, for example, we see a running process called ./foo.
We can see that it was started in the directory containing the executable, but we can’t see from this output which directory that is, or the full path to the executable started. There are multiple ways to do this, but we can quickly find answers to both these questions in a way that is also automation-friendly.
Under /proc/<pid> virtual directory (where <pid> is the process ID of the process we’re interested in), we can see two symbolic links of interest:
exe symlink, which points to the binary used to instantiate this running process, andcwd symlink, which points to the current working directory of the process.Using the PID 269792 belonging to the process in the output above, we can see both of these files and what they point to:
From this, we can tell that the program foo was started from the binary /home/matthew/src/rust/foo/foo, and that its current working directory (the default location for reading and writing files) is the same directory the binary was executed from, /home/matthew/src/rust/foo.
As a side benefit, the ls -l output above also shows the owner of the files. The Linux proc filesystem uses this to tell us which user the process is running as.
Now that we know where this process was started from, we likely want to know more about what it’s doing. One potential avenue of investigation would be to see what files it has open on the filesystem. The fd subdirectory contains symbolic links that point to files open by that process. Using the above process as our example again:
We can see that file descriptors 0, 1 and 2 point to a terminal, which probably makes them the stdin, stdout, and stderr for the process. We can also see that it has a file open called log in the /tmp/.data directory. That might be a good place to continue our search.
We’ve taken a quick look at a few objects under the /proc directory that can be used for forensics or in automation to find out information about currently running processes in real time. We’ll likely look into others in the future. Suggestions welcome.
Content related to Web Assembly (WASM).
At Versatus, we’ve chosen Web Assembly (WASM) as a target for our Smart Contract execution, as well as other general compute use cases such as Serverless Functions. As with any technology, it’s easy to get caught up in all of the hype. This quick article aims to lay out some of the reasons why we’ve chosen to use Web Assembly for these use cases.
The Web3 space is littered with single-purpose, custom languages for writing things like Smart Contracts. There are technical reasons why this is the case for some chains, but it increases the barrier to entry for new developers and isn’t necessary. By targetting Web Assembly for compiled Web3 components, developers are free to use the language of their choice in the IDE of their choice with the debugging and testing tools of their choice.
Just as we shouldn’t necessarily need to dictate which programming language a Web3 developer writes their code in, we feel that they shouldn’t care what hardware the code is eventually executed on. They certainly shouldn’t have to compile their code for one architecture when testing their code and for another architecture entirely when they wish to deploy and run their code.
Using the ever-growing set of tools for compiling many common (and some uncommon) languages to the common Web Assembly instruction set gives us a common execution target regardless of the programming language and regardless of the underlying hardware.
By default, Web Assembly is just a simple instructions for a virtual CPU. There are no networks or files or devices. This alone gives us a very small surface area to secure. We want to secure the network and the general population from malicious software, and we want to protect the resources of the hosts running the software from misuse or overuse. At the same time, we also want to protect the running software from outside attack. Out of the box, Web Assembly makes it easier for us to contain and secure the executing software.
The Web Assembly Systems Interface (WASI) is a set of extensions to WASM that allow us to selectively and carefully enable some basic I/O functionality, including potential file access or potential network access. Rather than these being a simple on/off switch, we can strictly limit these calls and resources and whitelist only what we know to be necessary and safe.
It is possible for someone like Versatus to extend a WASM runtime to include new functionality. This can be done in a number of ways, including adding new WASI calls, modifying the underlying implementation of existing WASI calls, or making use of the proposed component model to add new functionalities.
Consider the case where a developer is fairly new to Web3, understands how Content Addressable Storage (CAS) works in Web3, but doesn’t have the bandwidth to totally come up to speed with the inner workings of IPFS and the APIs needed to interact with it. With some extension to the WASM runtime shipped by Versatus, the following Rust code excerpt could potentially be all that is needed by that developer to retrieve the contents of a file from IPFS:
The virtual path /ipfs could be intercepted and handled by Versatus, allowing us to handle the complexities of IPFS and making it trivial for a developer to work with Web3 content.
Web Assembly (WASM) isn’t just for web browsers. It does help us to solve a number of issues around portability, security and simplicity, as described above. It will change the way a number of types of applications and services are deployed more widely in the industry. It isn’t perfect for every situation, and Versatus ourselves have other use cases where we won’t be using Web Assembly. We don’t believe that it will change the way operating systems work any time soon, as is suggested in this great article, but it will certainly have a lot of impact on the way some types of applications are developed and deployed and mtaintained in the future.
Content related to OpenSSH and the SSH protocol.
If you have used ssh to create a remote terminal session into a Linux or Unix machine, or if you have used related file transfer tools such as scp or sftp to transfer files between machines, you’ll be familiar with the idea that you’re establishing a point-to-point network connection, using the SSH protocol, from one machine (the client) to another (the server).
In the picture below, the laptop on the right is on the same network as the three servers (alvin, simon and theodore). It is able to establish that client-server connection, authenticate, and you have your ssh session.
But what about the laptop on the left? Due to the firewall and probably some stuff called NAT, it’s unlikely that the laptop on the left is able to establish network connectivity to the servers (alvin, simon and theodore) directly. When you’re at home or at the office, you can access those local resources, but when you’re remote, you can’t.
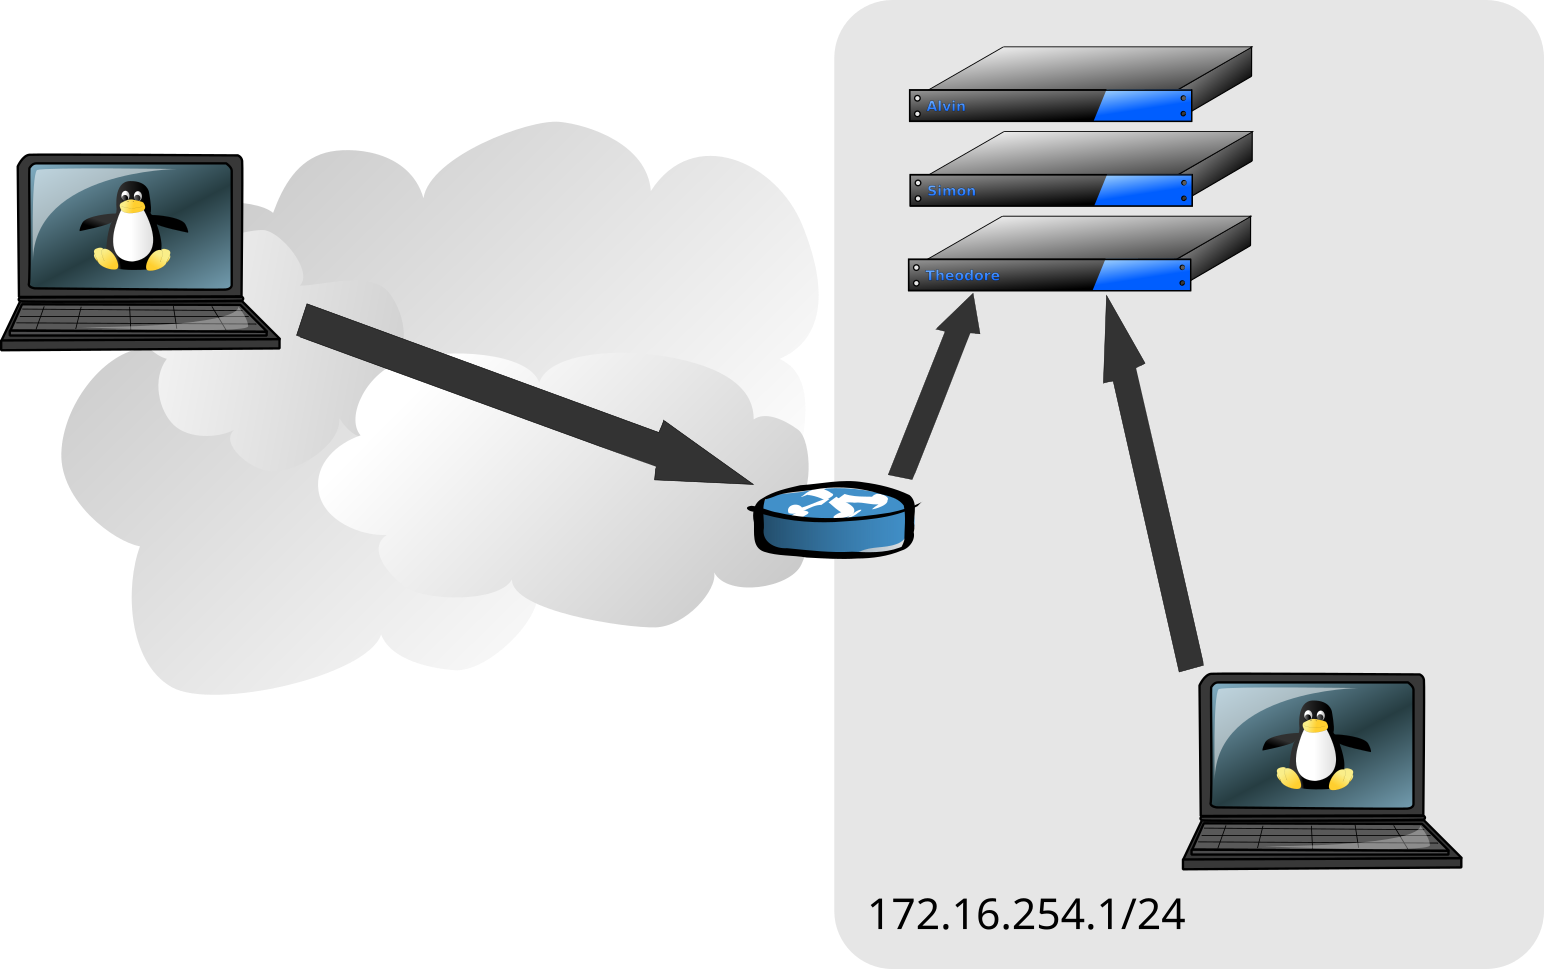
In these cases, it may be that the manager of the firewall might enable ssh on the firewall (or a machine near it in a DMZ) to act as a jump host. This would allow you to ssh from the laptop on the left, into the firewall machine and from there ssh to alvin, simon or theodore behind the firewall.
Here’s what an example session might look like:
This approach works, but does have some serious limitations:
scp or sftp might mean copying to the jump host first and then to the real destination, where the jump host may not have the capacity or a writeable filesystem.~ commands needs a ~ per ssh hop, which can be difficult to keep track of after a few hops.It is possible to have the ssh command handle the extra step for us by wrapping the SSH session we want inside an SSH session to the jump host. Using the ProxyJump configuration option (or the -J short option on the command line), we can have ssh automatically establish the session to the jump host. From there, ssh will tunnel our session to the servers over the jump host session. For example:
This has many advantages over the two manual steps above, many stemming from the fact that the session to simon in the above example is from laptop to simon, being tunnelled through jump-host. This allows us to use tools like scp to transfer files without having to store them on the jump host as part of the process. For example:
The scp command doesn’t have the short -J option, so we specify the long-form configuration option using -o.
You can use the -J option multiple times if you have multiple jump hosts to pass through.
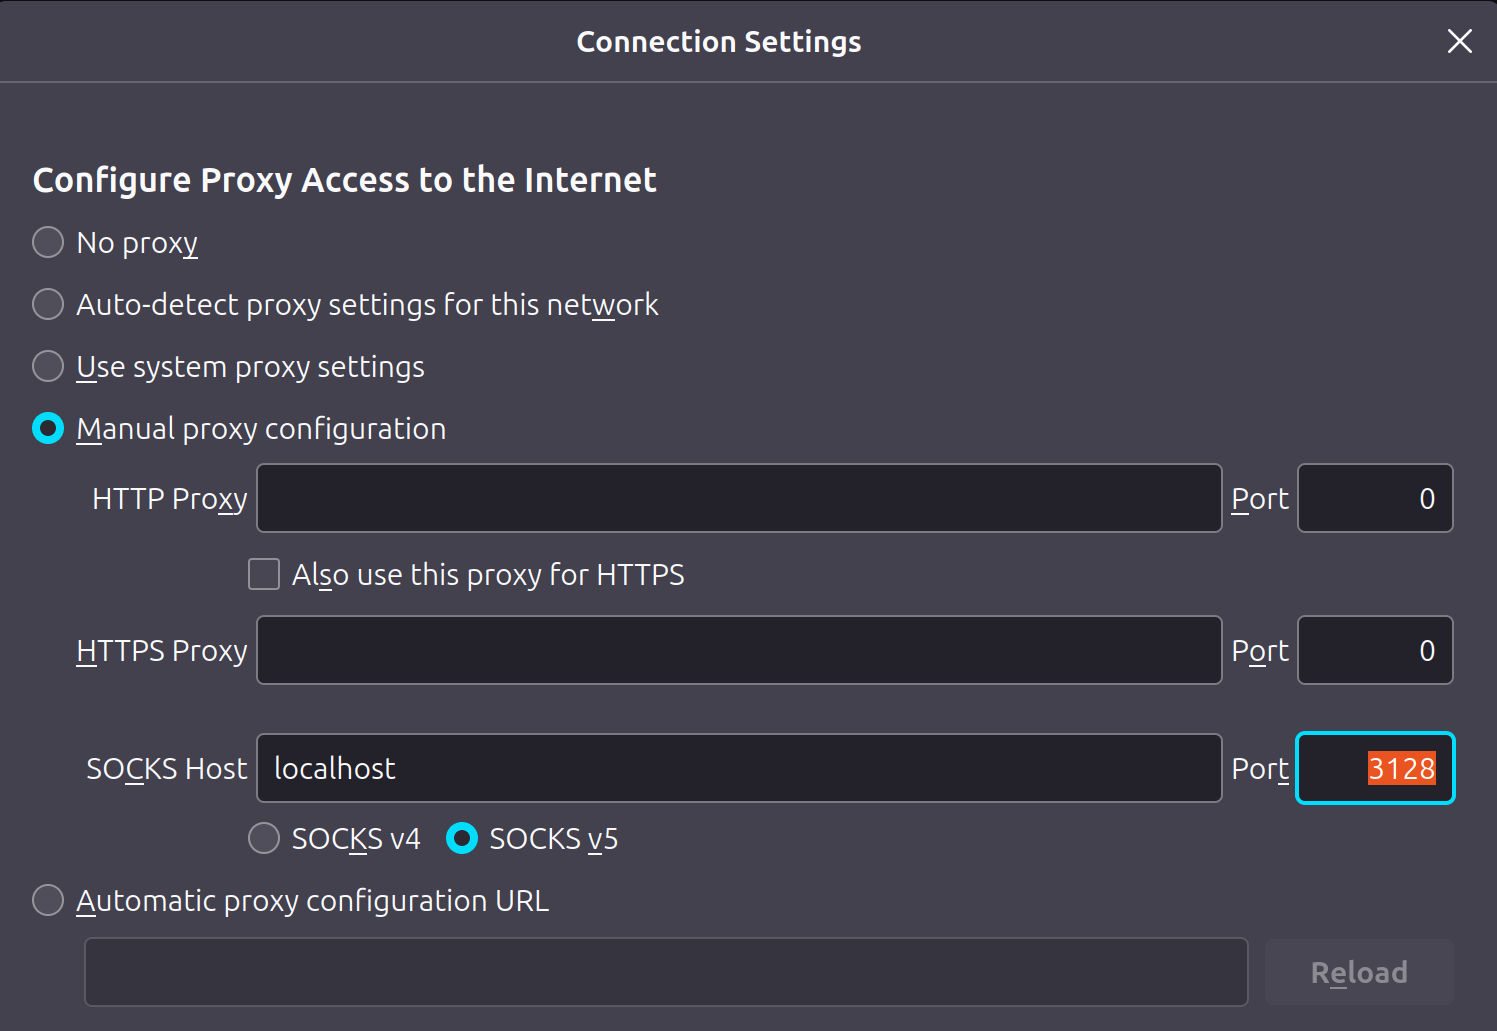
As mentioned, the -J option establishes a session to a jump host and then tunnels our SSH session to the remote server. OpenSSH is able to tunnel all kinds of things, including web browser traffic. By using the -D option and specifying an unused port number, ssh can listen on your local client machine (laptop in the example above) as a SOCKS5 proxy. It will then tunnel any web requests it receives over the SSH session to the jump host, and make the request on the remote network.
For example:
Then simply configure your web browser to use localhost as a SOCKS5 proxy with the port number specified with the -D option. From there, you ought to be able to browse content inside your private network (perhaps hosted on simon, alvin and theodore), with the web browser traffic being tunnelled (encrypted) over your SSH session through the jump host.